Master-Slave MySQL Configuration: Step-by-Step Guide for Database Replication
A comprehensive guide on configuring Master-Slave MySQL for database replication, helping you enhance scalability, redundancy, and performance in your MySQL deployments.
Learn how to set up Master-Slave MySQL configuration for seamless database replication. Follow this step-by-step guide to ensure data consistency, and redundancy, and improve scalability in your MySQL environment."
What is the Master-Slave Strategy?
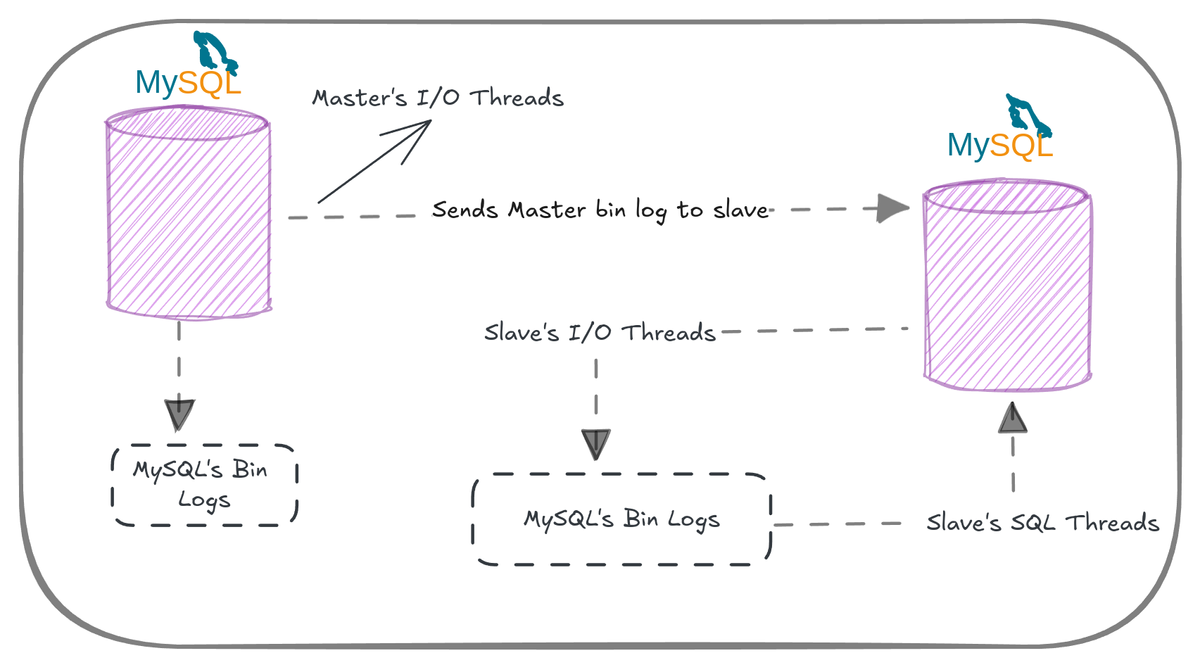
Master-slave replication, or active/passive replication, is a method employed in database systems to synchronize multiple copies of data across various servers. This approach improves system robustness and ensures smooth data distribution across several nodes within a distributed database setup.
How Does Master-Slave Replication Work?
Master-slave replication is crucial for building scalable database architectures. This section breaks down the process, from initialization and log shipping to how changes are applied on slave servers. By understanding the fundamental workings of master-slave replication, you’ll gain insights into how data flows efficiently across database systems.
Prerequisites
- Basic Mysql Knowledge.
- Linux
- Basic Networking Knowledge.
- Sudo Privilege or Root Access
Configure Firewall Rules
It depends upon which packages or cloud provider you are using.
Note: Change the this 192.168.1.10 IP, we have to implement this on master and slave. Use the master's IP on the slave server and the slave's IP on the master server.
- Using AWS Security Group.
- Go to AWS EC2 Dashboard and navigate to Security Groups.
- Select the Security Group associated with your MySQL server instance.
- Click on the Inbound Rules tab, and then click Edit inbound rules.
- Add a new rule:
- Type: MySQL/Aurora (or set Custom TCP if this is not available)
- Protocol: TCP
- Port range: 3306
- Source: Enter the IP address or CIDR range you want to allow (e.g.,
192.168.1.10/32for a specific IP).
- UFW (Uncomplicated Firewall)
To configure UFW for allowing access to port 3306 for a specific IP:
- Open the terminal on your server and run the following commands:
sudo ufw allow from 192.168.1.10 to any port 3306This allows only the specific IP (192.168.1.10) to connect to port 3306. You can verify the rule by running:
sudo ufw status- FirewallD
To configure FirewallD for allowing access to port 3306 from a specific IP:
- Open the terminal on your server and run the following commands:
sudo firewall-cmd --permanent --add-rich-rule='rule family="ipv4" source address="192.168.1.10" port protocol="tcp" port="3306" accept'- Reload the firewall for changes to take effect:
sudo firewall-cmd --reload
This will allow access to port 3306 only from the specified IP (192.168.1.10).
sudo firewall-cmd --list-allConfigure MySQL on Server 1 (Master)
- Edit MySQL Configuration on Master
- Open the MySQL configuration file on Server 1 to enable binary logging:
sudo nano /etc/mysql/mysql.conf.d/mysqld.cnf- Make the following changes
log-bin = /var/log/mysql/mysql-bin.log
server-id = 1              # Unique ID for this master server
max_allowed_packet = 64M    # Handle large queries if necessary
binlog-do-db = [database_name] # Specify the DB name for replication- Save the file and restart MySQL
sudo service mysql restart- Create Replication User
- Log in to MySQL on Server 1:
mysql- Create a replication user that Server 2 (Slave) will use to connect:
CREATE USER 'master_database_user'@'%' IDENTIFIED BY 'xzktPIj2zlnOJwZNd9tgl7NBKUCQewjrcFiYznmcWyN5QH6icd';
GRANT REPLICATION SLAVE ON *.* TO 'master_database_user'@'%';
FLUSH PRIVILEGES;
EXIT;- Backup the Master Database
- Dump the current database (e.g.,
st_staging_db_12f5awz) on Server1:
mysqldump -u root -p --master-data=2 st_staging_db_12f5awz > /root/st_staging_db_12f5awz_backup.sql- The
--master-data=2flag adds replication information, including the log file and position in the dump file.
- Get the Master Status
mysql
SHOW MASTER STATUS;- Take note of the
File(e.g.,mysql-bin.000003) andPosition(e.g.,186651).
EXIT;Transfer the dumped SQL Database to the Slave Server
- Use SCP or Rsync Command to securely send the data to another server.
- If you didn't generate the ssh key
- Note: Use this command on Master Server
ssh-keygen- Now copy the content of the
id_rsa.pubkey.
cat ~/.ssh/id_rsa.pub- Paste the public key onto the Slave server's authorized key file.
nano ~/.ssh/authorized_keysSave the file, and now we are ready to transfer the dumped .sql file.
- Go to the master server and start the tanfer
scp st_staging_db_12f5awz_backup.sql root@slave-server:/root/Configure MySQL on Server2 (Slave - New Server)
- Edit MySQL Configuration for Replication
sudo nano /etc/mysql/mysql.conf.d/mysqld.cnf- Set the
server-idto a unique value (different from Server1):
server-id = 2
- Save and restart MySQL:
sudo service mysql restart
- Restore the backup into Server2's database:
- Create the Database if not exist.
mysql
CREATE DATABASE IF NOT EXISTS st_staging_db_12f5awz;
EXIT;
mysql -u root -p st_staging_db_12f5awz < st_staging_db_12f5awz_backup.sqlConfigure Replication on the Slave
- Log into MySQL on Server2 (Slave):
mysql- Stop any existing replication and reset the slave configuration:
STOP SLAVE;
RESET SLAVE ALL;
- Set up the slave to replicate from Server1 using the binary log file and position you retrieved earlier:
CHANGE MASTER TO
MASTER_HOST='<Server1_IP>',
MASTER_USER='repl_user',
MASTER_PASSWORD='your_secure_password',
MASTER_LOG_FILE='mysql-bin.000003',
MASTER_LOG_POS=186651;- Start Replication on the Slave
- Start replication on Server2:
START SLAVE;
- Verify the replication status:
SHOW SLAVE STATUS\G;- Ensure
Slave_IO_Running: YesandSlave_SQL_Running: Yes. If these values are bothYes, replication is successfully running.
Monitor and Test Replication
- Monitor Data Flow
- On Server2, keep checking the
SHOW SLAVE STATUS\Gcommand to ensure no replication errors. As changes happen on Server1, they should replicate to Server2. - You can also make small changes on Server1 (like adding a test table) and see if it appears on Server2.
- Troubleshooting Replication
- If replication isn’t working as expected, check the
Last_Errorfield in theSHOW SLAVE STATUS\Goutput for any issues. - Possible common issues:
- Firewall restrictions
- Incorrect
MASTER_LOG_FILEorMASTER_LOG_POS - Incorrect user credentials for replication
>>>> Next We will learn how to setup the monitoring for MySQL Monitoring <<<<